
Sailing
| Arelith Wiki | |
| Character Creation | |
|---|---|
| Creation (New Players Guide) Race - Deity - Class Gifts - Backgrounds - Alignment Marks - Epic Sacrifice Customization - Head List - Builds | |
| Character Systems | |
| Description - Disguise / Covered Languages - Experience - Quests Pickpocket - Rest - Role Play Bonus Death - Lycanthropy - Investigate Sequencers - Runic Sequencers | |
| World Systems | |
| Settlements - Factions Quarters - Shops - Taverns - Banks Riding - Sailing - Boons Communication - Portals Time - Containers/Bags Radiant Heart - Assassin's Guild Sencliff's Pirates | |
| Item Creation Systems | |
| Alchemy - Art Craft - Carpentry Herb - Smith - Tailor Dweomercraft - Runes | |
| Armor Weapons - Melee / Ranged / Siege Resources - Poison | |
| Arelith Changes | |
| Classes - Skills - Feats - Trap Summons - Familiar Reskins Spells (list) - Misc | |
| Help | |
| Rules - Roleplay - Maps Console Commands Common Bugs - Staff Support Tickets - Character Remake [The Astrolabe] | |
Sailing is the process of using boats or ships to travel. Many such craft are available on Arelith to rent or own.

Ship Access
To use a ship first you must gain access to one by finding and using a Ship Sign and then you must find where the ship is anchored and board the ship using the Docks.
Ship Signs
Ships are purchased or rented by finding their sign on land. These signs remain stationary in a single location no matter where the ship is at. Clicking on the sign of a ship you own shows options similar to Quarters on land, such as changing name and allowing faction access and ownership.
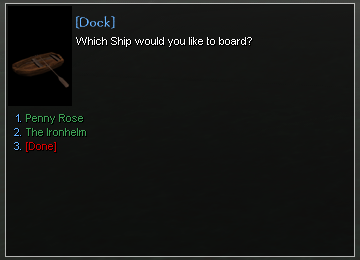
Docks
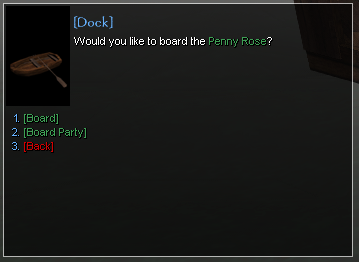
To board a ship, find and click on the Dock placeable. Anyone can use the Dock placeable which lists all the ships currently anchored off that particular Dock. Selection of a specific ship in the list then presents the user with the option to board individually or board a party. If you have permission to access the ship (see purchasing or renting above) you and/or your party will board the ship.
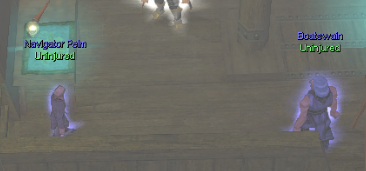
On board the ship are several NPCs allowing the user to control the ship. The Navigator character sets the course for the ship and allows the owner to take other actions at sea. They also provides information about ownership while away from the ship's sign. The Boatswain character can lower the skiff or dinghy to bring the user and/or party to shore.
In addition, most ships contain internal areas and a storage chest like Quarters on land.
Ship System
The Ship System functions on a Naval Grid (grid), with ships having a physical location on the Naval Grid (grid square) itself. Navigation is the traversal of a ship across the Naval Grid.
The grid represents the area of the Trackless Sea surrounding Arelith, with Arelith in its center grid square. The center grid square ("Origin," at 0,0) is considered "safe-waters," and within that center grid square you can travel to all Arelith-specific ports and encounter some Random Events like NPC vessels and Locations. However, any Player vs Player Ship Interaction is disabled within the center grid square (Arelith).
Outside of the center grid square, you will encounter the wider Trackless Sea; here Ships navigate a large grid with fixed Landmarks and encounter Random Events based on the region of the map the ship is currently located at.
Random Events
Ships traveling at sea will often come under attack by NPC monsters or discover a variety of randomized destinations which are available to find at sea. Some of these contain treasure and resources and provide new foes and challenges.
The Challenge Rating (CR) of these events will increase with further distance from the center grid square (Arelith). Sailing deep waters is now consistently dangerous, but can also be rewarding as some encounters will only be found so far from friendly coasts.
Landmarks
Landmarks are fixed and always spotted when in the same grid square and can be docked at
- Example: Red Dragon Island).
Ship Usage
When sailing outside of Arelith on the Trackless Sea you must choose a Cardinal Direction to move your ship towards. This will move your position between grid squares on the map and the duration it takes to travel 1 grid square in distance depends on a number of factors:
When reaching a new grid square on the map the ship will continue to travel along its given direction automatically and you have to order it to stop in that grid square if you wish to stay there. As explained above, some grid squares offers unique Landmarks and region specific Random Events so staying there is always a valid option. The Ship's Navigator lets you plot a Direction.
Most ships have a map placable one can use. Interacting with this map lets you view the Trackless Sea grid and the ship's current location on this grid.


Spyglass / Vicinity
Another feature is the Spyglass option. This option lists everything your ship has spotted and found in the surrounding area. It can be a Landmark, Random Event or another Player Ship.
Player ship spotting mechanic takes a few things into consideration such as:
The Spyglass can be accessed from the Navigator and the Navigator will also report any findings each tick.
Player vs Player Ship Interaction
The Trackless Sea is open for Player vs Player ship combat, but any direct interaction between ships can only be done if their locations are close enough to each other.
Ships are only valid targets to another ship if they fail a Hide check, and are physically close to one another on the grid. Furthermore, hostile actions such as Grappling and Weapons are only allowed if a target ship is within 1-grid square distance (non-diagonal) of one's current location.
If a ship is diagonal from another ship's location, it may be spotted and one can scout its direction to try and pursue it but it can't be engaged by any hostile means until pursued and directly adjacent again.
Weapons
Weapons behaves like fixtures and you simply place them on the Deck of a Ship to make use of them. Each weapon has its own type of projectile that is required to fire them. Valid targets are spotted within a straight, non-diagonal, vicinity of the ship as already explained above.
Grappling
You can always grapple a ship that is within vicinity but the more Health and Speed a target ship has the more difficult it will be to grapple it. This is why its always better to weaken a ship first with weapons before grappling.
Ship Abilities
Some ships have unique abilities that can be triggered from the Navigator. If a Ship has multiple abilities the cooldown of all abilities will be the last ability activated. Only one ability can be activated at a time. (Ex.: a "Horn Blast" which provides minor buffs to the attacking crew and debuffs to the defending crew.)
Jump Overboard
This option allows for a Constitution save vs death to appear in a random location. This location can be anything from the standard islands to another player run ship if it is out.
The Jump Overboard option is an interactable square on the deck of the ship
Additional Features
Ship to Ship Communication
Ships on the same grid square, outside of the center grid square (Arelith) can use the Shout channel to communicate with each other.
Critical Ship Alerts
Critical Ship Alerts will now alert players below deck or in other areas linked to a ship.
Ship Management
Weaponry
Some ships can now hold ship weapons. Smaller ships are unable to use weapons but larger ones can and this comes in 4 Tiers:
- Tier 0 - No Weapons
- Tier 1 - Light Ballista
- Tier 2 - Heavy Ballista
- Tier 3 - Mangonel
- Tier 4 - Bombard
Ships have a Weapons capacity (Mmaximum tier level) representing how many weapons can be deployed on them, Shipwrights will display the weapon capacity of a ship. For instance a Ship with a Weapon Tier of 3 can hold a Mangonel but not a Bombard. Alternatively It could also hold 3 Light Ballistas (Tier 1) that together becomes a total of a Tier 3 or 1 Light Ballista and 1 Heavy Ballista. This offers different loadouts one can experiment with. The penalty of using weapons on a ship is losing speed. For each Weapon Tier(s) utilized by fitting a weapon, a ship will lose 7% speed, so a fully maxed weapon loadout at Tier 4 would give a 4 x 7 = 28% penalty to Ship's Speed.
See the Siege Weapons page for recipes for crafting the ship-based weaponry.
Upgrades
A ship can be upgraded by spending resources and gold at a Shipwright NPC. Higher Tiers require more rare and sometimes very unique resources or items. Each ship has different max tiers; for example, a ship might be able to be upgraded to Tier 1 Sails and Tier 4 Hull.
Currently there are two upgrades available:
- Hull - Increases a Ship's Hitpoints
- Sails - Increases a Ship's Speed
Destruction
A ship can be destroyed and sink if its Health goes below 0. When this happens all players on board the ship will fall into the sea much like the "Jump Overboard" feature. A destroyed ship is useless until the next server reset where it will be brought back again. However, the penalty of losing a ship will also decrease all its Upgrades by 1 Tier and destroy any deployed weapons on deck.
- Note: You can repair your ship's hull at a Shipwright NPC.
Persistent Location
Ships are now storing their location persistently by Landmark or Dock. Meaning each time a ship reach a new harbor (Not Random Event locations) it will spawn there next reset. Rentable ships are excluded from this.
Weather
The weather will change depending on region of the Trackless Sea a ship is currently located at: e.g colder in the North, warmer in the South. Weather has a large impact on many features of the Ship System. For instance a thick fog will make it more difficult to spot ships and target them and tailwind will increase the speed of a ship.
Ship Tools/Items
Certain items/tools exist in the game which can be used, from a characters inventory, while sailing. These items must be obtained by the character in the module and brought on to the ship to be used.
Sextant
Use this tool (Requires INT) on a ship to determine an approximate time left remaining to a destination (landmark, dock) or quadrant.
Spyglass
- Note: This should not to be confused with the Navigator feature of the same name.
This item an be used on the deck of a Ship and allows the user to select a spotted vessel in the vicinity to assess. The user must make a Spot skill check to reveal further information about a Vessel.
- Failing the check reveals basic information.
- Succeeding the check reveals:
- The Vessel's Speed (vs your own Ship)
- Hull Integrity
- Number of Players on Deck
- Which weapons are deployed on the Vessel.
This item can be bought from the Trading Ship merchant.
Sailing the Penny Rose
An example afternoon trip on the Penny Rose renting the ship, traveling to the Crow's Nest to check on the hull, a quick jaunt out East to a shipwreck, and then back to the Penny's home at the Brogendenstein docks.
Renting a Charter Ship
Visit the Brogendenstein docks. Down the cliffs and at the edge of the surf is the sign to rent the Penny Rose. Have 500 gold ready and, if the ship isn't already rented, it will be possible to rent the Penny Rose. Once rented, the Penny Rose marker will display a quarter management menu. Quarters powers have limited uses for rent-able ships, but for leased and state-owned ships that have true ownership leases these options are important for faction management.
The Captain function in faction management is still useful for rent-able ships. Setting this status allows characters with the faction Captain role to also speak to the navigator and pilot the ship. First, assign a faction from the quarter management menu for the Penny Rose. Next, in the -factions menu choose the faction assigned and choose view ranks > select a rank to have Captain powers > choose Set Powers > choose Shop and Quarter powers > and Captain will be at the bottom of that list. Click the Captain power once to toggle from red to green to turn the Captain ability on. Now, characters in the faction with the chosen rank will be able to Captain the ship as well.


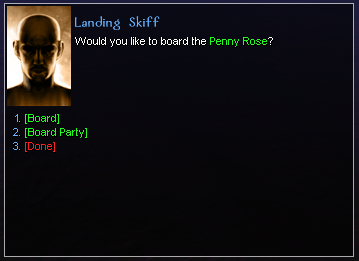
Boarding
Head North from the Penny Rose's marker to find the Docks interact-able to board the ship. Other ships are visible, but it is not possible to board a ship from the docks if it is not rented or leased. Choose the Penny Rose and board as a single person or as the whole party. Characters in party are only able to board by standing next to the renter/owner while the renter/owner uses the party board option. Characters in the assigned faction (if one is assigned) are able to both board and party board.
-
The Docks interact-able will show all the ships currently docked. -
Boarding the Penny Rose.


Getting Acquainted
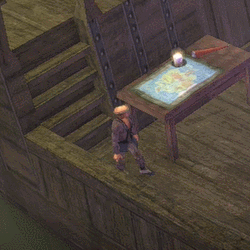
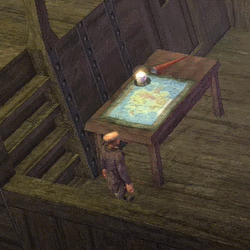
Meet the crew of the Penny Rose. Speak to Navigator Pelm to give sailing orders. The Boatswain will lower the skiff to allow departure from the ship at destinations. Crews on the other ships may be different, but all ships will have a navigator and a boatswain. Take a minute to explore the Penny Rose. It has a map, captain's room, below-decks, a place to jump overboard, and the fishing nets ability will deploy two interact-ables on the bow that allow fishing.
The ship is currently in the Local Waters naval grid. Take a moment to see the navigation and sailing options.
-
Navigator, Map, and Boatswain on the deck of the Penny Rose. -
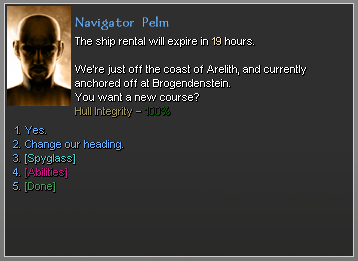
The navigator's menu when anchored at Brogendenstein. -

This menu is only available in the Local Waters naval grid. -
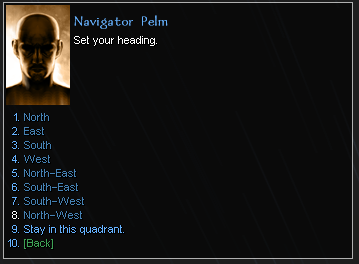
Choosing a heading rather than a destination. -
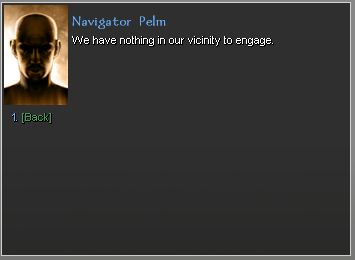
Checking the spyglass while anchored. -
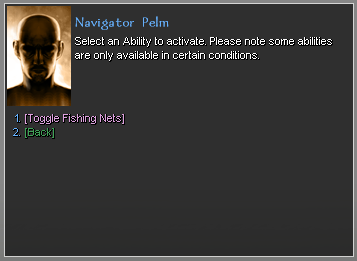
Checking the Abilities menu.


Getting Underway
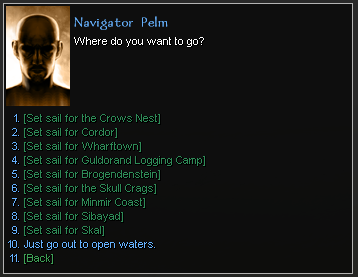
Starting the journey. Choose Yes and then Set Sail for the Crows Nest. Note that this friendly destination menu is only available in the Local Waters naval grid. When sailing in open waters the option becomes to return to Arelith. The ship will animate with wake effects once it is underway.
Be ready for the possibility that enemies may board the ship. That could include others players if sailing outside the Local Waters naval grid. Only NPC enemies are possible in the first leg of the trip as only Local Waters are traveled.
The Navigator will announce any landmarks or other ships that pass by. Landmarks, naval grid changes, ships, and destinations also play a bell sound. On this first step of the trip the Penny Rose arrives at the Crow's Nest without spotting any land marks, but is boarded by enemies once.
-

Setting sail. -
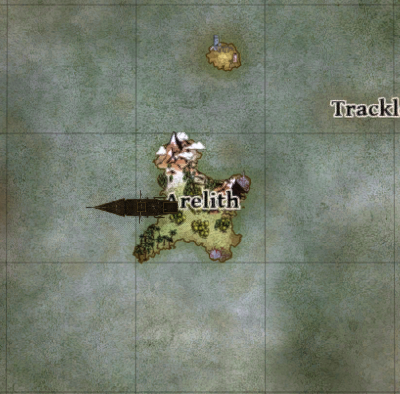
Checking the map while underway to the Crow's Nest. -

NPC enemies boarding on the journey to the Crow's Nest. -

Checking in with the Navigator while en-route to the Crow's Nest. -

The Navigator announces arrival at the Crow's Nest. -
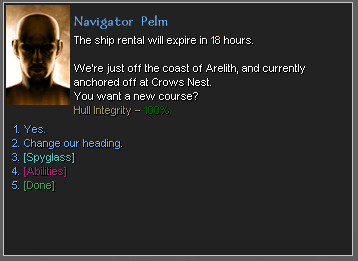
Checking in with the Navigator as the Penny Rose arrives at the Crow's Nest. -
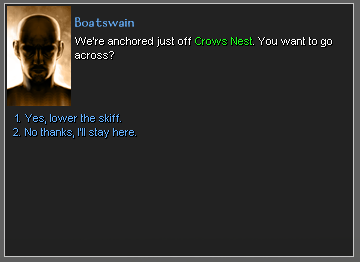
Leaving the Penny Rose for the Crow's Nest.


Speaking to the Shipwright
The Crow's Nest has a shipwright who can repair and upgrade ships that are docked there. Visit the Shipwright and see the upgrade options, including hull repair if damaged. Return to the Penny Rose by using the Docks at the Crow's Nest. Set off from the Crow's Nest and head back out to sea. This time choose East as the heading.
-
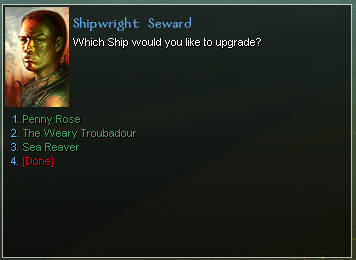
Speaking to the Shipwright. -
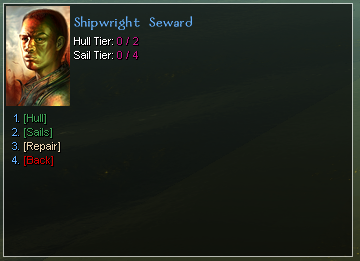
Checking on the Penny Rose's upgrades. -
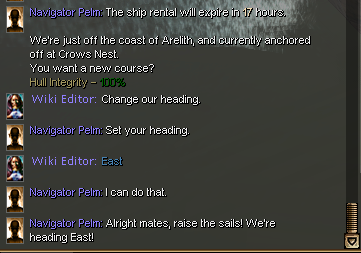
Leaving the Crow's Nest and heading East.


Encountering Landmarks
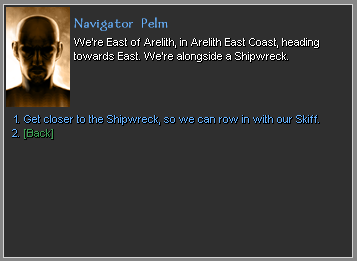
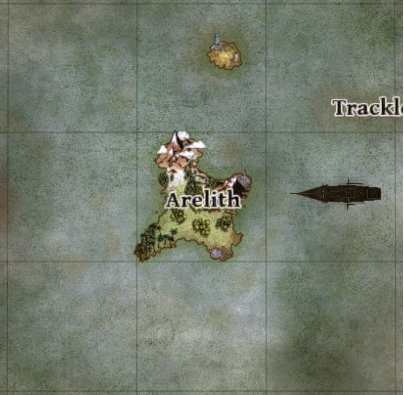
While heading East there is an alert that the Penny Rose has moved into the East Coast naval grid. It is now possible to encounter other player ships. As the journey East continues a shipwreck landmark is spotted. At this time it is possible to choose to visit the landmark by using the spyglass. Use the spyglass to interrupt the Eastward heading and sail towards the landmark. Once anchored at the landmark use the Boatswain to disembark and visit the shipwreck.
Eventually, if the spyglass hadn't been used, then the Penny Rose would have sailed past the landmark and continued Eastward. The ability to see the shipwreck landmark and use the spyglass to visit would be gone unless it was spotted passing by again later.
-
The Navigator announces moving into the East Coast naval grid. -
The Navigator announces that a shipwreck is spotted. -
Using the spyglass to sail to a landmark. -
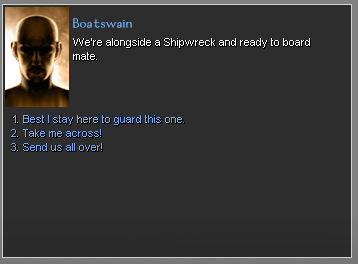
Talking to the Boatswain to disembark to the landmark.


Returning Home
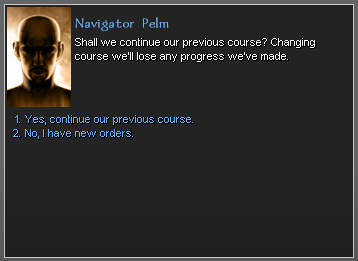
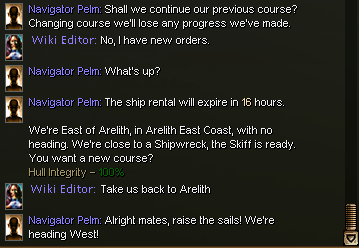
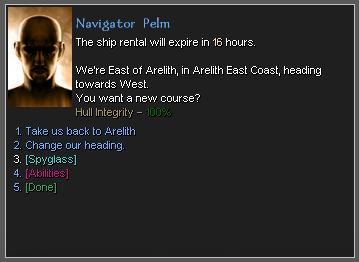
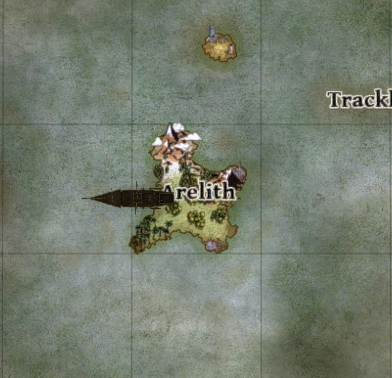
Return to the Penny Rose and head home after visiting the shipwreck. Landmarks will have docks or skiff landing sites to use to return to the ship. Return to the ship and speak to the navigator to continue the course or have a new direction. Continuing the course would mean continuing East. Choose new orders instead and choose to return to Arelith.
Note that the destination list is gone and is replaced with the option to "Take us back to Arelith". When the ship is out of the Local Waters naval grid there is no destination list. This does not mean it is not possible to sail to destinations. Sailing to a destination is also possible by knowing where the destination is on the map and using the map and heading direction orders to navigate to the destination.
-
Using the skiff at the landmark to return to the Penny Rose. -
Speaking with the Navigator while at a landmark. -
Directing the Navigator to return to Arelith. -
Checking in with the Navigator as the Penny Rose is heading home. -
Viewing the map as the Penny Rose is heading home.


Last Leg
Return to the Local Waters naval grid and choose the Brogendenstein destination. A sandbank landmark is spotted, but the Penny Rose heads home rather than investigating.
Note that 4 in-game hours have passed since the ship was rented, sailed, and returned. This is more than 24 minutes of real time spent on the short trip. This is for a Penny Rose ship without any upgrades.
-
Checking the map when arriving in the Local Waters naval grid. -
The destination list is back since the ship has returned to the Local Waters naval grid. -

Navigator conversation to return to Brogendenstein from the Local Waters naval grid. -
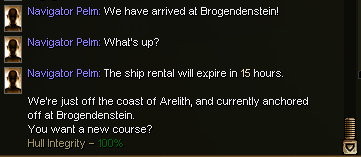
Navigator announces returned to Brogendenstein.


