
Sailing
| Arelith Wiki | |
| Character Creation | |
|---|---|
| Creation (New Players Guide) Race - Deity - Class Gifts - Backgrounds - Alignment Marks - Epic Sacrifice Customization - Head List - Builds | |
| Character Systems | |
| Description - Disguise / Covered Languages - Experience - Quests Pickpocket - Rest - Role Play Bonus Death - Lycanthropy - Investigate Sequencers - Runic Sequencers | |
| World Systems | |
| Settlements - Factions Quarters - Shops - Taverns - Banks Riding - Sailing - Boons Communication - Portals Time - Containers/Bags Radiant Heart - Assassin's Guild Sencliff's Pirates | |
| Item Creation Systems | |
| Alchemy - Art Craft - Carpentry Herb - Smith - Tailor Dweomercraft - Runes | |
| Armor Weapons - Melee / Ranged / Siege Resources - Poison | |
| Arelith Changes | |
| Classes - Skills - Feats - Trap Summons - Familiar Reskins Spells (list) - Misc | |
| Help | |
| Rules - Roleplay - Maps Console Commands Common Bugs - Staff Support Tickets - Character Remake [The Astrolabe] | |
Sailing is the process of using boats or ships to travel. Many such craft are available on Arelith to rent or own.
Sailing Skill
- Non-rental ships, and the Liberator, will have a Sail skill requirement to be purchased, associated with their size (Item bonuses do not apply for this check).
- All Sail Skill checks are transparent and will be displayed in your console showing your roll and the DC using the Ship Mechanics. Like regular skill checks rolling 1 is a critical failure, 20 critical success.
- Ships now has a required crew size based on the Ship's size, ranging from 1-5 players and flagships with 6 (Guldorand Galley, Cordor Flagship & Dreadnought). You can still use a ship without meeting the Ship's requirement but will have penalties as will be discussed below.
Sail Skill has been split into two parts, one that is the total average skill for the crew on deck and one that is a regular individual skill check. The ship's total sail skill is calculated by taking the PCs with the highest ranks in Sailing, capped by the ship crew size amount of players, on deck of a ship and dividing it by the ship's required crew size.
So for instance the Sea Leopard has a required crew size of 4 but if there's only two players on deck, each with 10 ranks in Sail, the total Sail skill of that ship would be: (10 + 10 + 0 + 0) / 4 = 5
This encourages more players on deck and take part of the ship's voyage and invest into Sailing.
Another example: The Cordorian Flagship has a required crew of 6. If there are 8 players on deck, it will only grab the 6 players with the highest rank in Sailing. So it could be something like this with varying ranks in sailing:
(20 + 15 + 12 + 10 + 5 + 2) / 6 = 10
Item bonuses applies for these checks and if a player has no ranks in sailing they will at least contribute with a +1 to the total skill for a ship. The different required crew sizes are: 1, 2, 3, 4 & 6 based on a Ship's size.
- A Voyage Sail Skill check will be done each time a ship enters a new quadrant on the map. This check is done with the total Sail rank of that ship as mentioned above.
This skill check is of varying DC depending on a number of factors such as weather and how far off from the coast of Arelith the ship is. Succeeding a Voyage Check will decrease travel time by 1 minute (1 tick), failing will add 1 tick to it. Additionally, succeeding the check will also reward Experience to players on board the Deck of that ship based on how far off that quadrant is from Arelith shores.
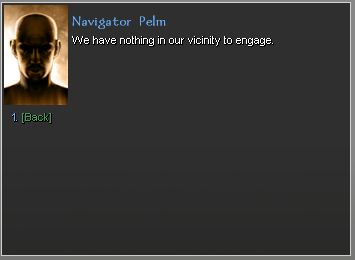
- An Avoid Enemy Encounter skill check will be done each time a random enemy encounter (PvM) is spawned on a ship. Succeeding this check will make the ship avoid the encounter and rewarding experience to the crew on deck.
- Toggle option to the Navigator under Abilities to either engage or evade enemy random encounters. By default its on evade.
Failing will result in a regular enemy encounter. DC is based on distance from Arelith Shore for that quadrant with some slight randomness to it.
- An average Sail Skill check is done when using Ship Weaponry (Not the grappling hook) for a PC using that weapon. The defending ship will also apply their combined Sail Skill to increase the DC.
Success will damage the ship and reward the player with experience.
- Ships vs Ship Hide skill check has been updated to use the total Sail skill of the Ship for both the ship trying to avoid being spotted and the ship doing the spotting to calculate rolls and DCs.
- The Sextant item can now also be used by anyone with at least 15 ranks in Sailing. It can still be used by anyone with an INT modifier of at least 3 or more.
- The Spyglass item has been updated from a Spot check to a Sail check by the person using the item.
-ship command
- -ship command. This can only be used on the Deck of a Ship.
Reveals some basic information like ship heading, weather, and other statuses. It also allows for repairing the Vessel without a drydock. Repairing requires some resources based on what you are repairing, Carpentry or Tailoring (Hull or Sails). A crafting check will be made and the DC will be affected by some parameters such as if the ship is docked or out at sea.
A minimum sail rank of 15 is required to start repairs. This also introduced a Masterly Skill check with a increased DC of +20 if you make the initial DC. Failing this Masterly Check won't fail the first roll you made. Making the Masterly Skill Check will increase the amount repaired.
Masterly Skill check has also been added to the Voyage skill check, making that will decrease the time even further when traveling the seas. This is a test and we can add more Masterly Skill checks as we go, their bonuses are very unique and based on the context of what you are rolling for.
Traits are different bonuses given to some Ships, use the -ship stats to view them, if any, and their info.
Ship Access
To use a ship first you must gain access to one by finding and using a Ship Sign and then you must find where the ship is anchored and board the ship using the Docks.

Ship Signs
Ships are purchased or rented by finding their sign on land. These signs remain stationary in a single location no matter where the ship is at. Clicking on the sign of a ship you own shows options similar to Quarters on land, such as changing name and allowing faction access and ownership.
Docks
To board a ship, find and click on the Dock placeable. Anyone can use the Dock placeable which lists all the ships currently anchored off that particular Dock. Selection of a specific ship in the list then presents the user with the option to board individually or board a party. If you have permission to access the ship (see purchasing or renting above) you and/or your party will board the ship.
On board the ship are several NPCs allowing the user to control the ship. The Navigator character sets the course for the ship and allows the owner to take other actions at sea. They also provides information about ownership while away from the ship's sign. The Boatswain character can lower the skiff or dinghy to bring the user and/or party to shore.
In addition, most ships contain internal areas and a storage chest like Quarters on land.
Barnacles will spawn on ships that are inactive for roughly a week. Activity is determined by each time the ship is taken to the sea, and barnacles will either spawn or be removed based upon that.
Ship System
The Ship System functions on a Naval Grid (grid), with ships having a physical location on the Naval Grid (grid square) itself. Navigation is the traversal of a ship across the Naval Grid.
The grid represents the area of the Trackless Sea surrounding Arelith, with Arelith in its center grid square. The center grid square ("Origin," at 0,0) is considered "safe-waters," and within that center grid square you can travel to all Arelith-specific ports and encounter some Random Events like NPC vessels and Locations. However, any Player vs Player Ship Interaction is disabled within the center grid square (Arelith).
Outside of the center grid square, you will encounter the wider Trackless Sea; here Ships navigate a large grid with fixed Landmarks and encounter Random Events based on the region of the map the ship is currently located at.
Random Events
Ships traveling at sea will often come under attack by NPC monsters or discover a variety of randomized destinations which are available to find at sea. Some of these contain treasure and resources and provide new foes and challenges.
The Challenge Rating (CR) of these events will increase with further distance from the center grid square (Arelith). Sailing deep waters is now consistently dangerous, but can also be rewarding as some encounters will only be found so far from friendly coasts.
Landmarks
Landmarks are fixed and always spotted when in the same grid square and can be docked at
- Example: Red Dragon Island).
Ship Usage
Ship Name
Since there's no clear visual way to identify ships you encounter at sea, ships should be given unique names. The main identifier of a ship with our system is its name, which is quite a big mechanical limitation. Giving a ship the same name as another is taking advantage of this particular OOC limitation and shouldn't be done.
Some Ships no longer have a Navigator or Boatswain NPC. Instead, those ships use placeable objects. Behavior is the same.
When sailing outside of Arelith on the Trackless Sea you must choose a Cardinal Direction to move your ship towards. This will move your position between grid squares on the map and the duration it takes to travel 1 grid square in distance depends on a number of factors:
When reaching a new grid square on the map the ship will continue to travel along its given direction automatically and you have to order it to stop in that grid square if you wish to stay there. As explained above, some grid squares offers unique Landmarks and region specific Random Events so staying there is always a valid option. The Ship's Navigator lets you plot a Direction.
Most ships have a map placable one can use. Interacting with this map lets you view the Trackless Sea grid and the ship's current location on this grid.


Vicinity
Another feature of the Navigator is the Vicinity option. This option lists everything your ship has spotted and found in the surrounding area. It can be a Landmark, Random Event or another Player Ship.
Player ship spotting mechanic takes a few things into consideration such as:
The Vicinity can be accessed from the Navigator and the Navigator will also report any findings each tick. Note that this is different from using the spyglass item.
Additionally, Underdark Ships are protected by a magical darkness and requires an additional roll, at higher DC, with the Spyglass Item to reveal Crew and Weapon Loadouts on them.
Player vs Player Ship Interaction
The Trackless Sea is open for Player vs Player ship combat, but any direct interaction between ships can only be done if their locations are close enough to each other.
Rules
- Before engaging another ship in combat you must do at least two of the following.
- Swap flags to indicate your hostile intent. Hoist the jolly roger, so to say.
- Fire a warning shot at the other players.
- Use the shout system, if possible, for intervessel communication. (Ship-to-ship shouting can only be heard while within the same quadrant.)
- Give a fair and reasonable amount of time for the other players to react to your presence. We have logs. If you’re trying to game the system for an unfair surprise advantage, we’ll know.
- When boarding, adhere to these guidelines.
- Once boarding has begun, characters must roleplay before fighting.
- Time must be given for everyone to board and to load in.
- Do not use persistent area of effect spells like Storm of Vengeance until the fighting has begun.
- Do not set traps on the transitions.
- Do not jump over and immediately begin attacking. Roleplay.
- Do not immediately begin attacking the invaders. Roleplay.
Sinking or being sunk initiates the fourty eight hour rule. Avoid each other as much as possible. Ships make it hard to know who to avoid. Do your best.
Weapons
Weapons behaves like fixtures and you simply place them on the Deck of a Ship to make use of them. Each weapon has its own type of projectile that is required to fire them. Valid targets are spotted within a straight, non-diagonal, vicinity of the ship as already explained above.
Firing a Ship Weapon uses the Ship's total Sail Skill Average rather than the individual's Sail rank using the weapon.
Ship Weapon projectiles do not deal extra damage based on their enchantment but instead gives a bonus to penetrate Ship DR and bonuses to Attack Rolls. E.g a +3 Projectile would give +3 AB and break DR x/+3.
Base Damage on all weapons:
- Light Ballista: 3 Damage
- Heavy Ballista: 9 Damage
- Mangonel: 15 Damage
- Bombard: 24 Damage
The Different sail states have AB / AC numbers:
- Full Sail = 100 Speed, -5 AB, +3 AC
- Half Sail = 50% Speed
- Lowered Sails = 5% Speed, +3 AB, -5 AC
Ship Weaponry Attack Roll: Ship AB = 1d20 + (Crew Sail Average / 5)
Ship AC: Ship AC = 10 + (Crew Sail Average / 5)
Crit Range increases by 1 for each 5 sail advantage a crew has against another. This caps at 14-20/x3 at +30 sail advantage.
Guards
Ship Guards can now be dismissed by talking to them.
Note: They will not return until the next reset.
Grappling
You can always grapple a ship that is within vicinity but the more Health and Speed a target ship has the more difficult it will be to grapple it. This is why its always better to weaken a ship first with weapons before grappling.
Toggleable option to the Navigator / Ship's Wheel under "Abilities" that lets a ship allow or deny boarding. By default this is on Deny. If a ship Allows boarding this will let another ship Grapple it without having to roll for it.
Note: Grapple targets need to be within the same quadrant.
Ship Hide
Calculations for Ship Hide has been updated slightly, if a Ship is in the same quadrant as another ship they receive -10 on their Hide check when being searched within the Vicinity. Staying a quadrant away keeps it unchanged.
A Ship will be automatically spotted when firing upon another Ship when its Daytime and Clear Weather and they are not close to a Landmark. A ship can hide as usual if its Nighttime or a specific weather condition.
Hiding also receives a penalty equal to the damage of the weapon firing (Including Grappling Cannon) and has no cap, will be reset each tick.
Disable / enable Ship Hiding from the Abilities menu.
Ship Damage Reduction
Added DR for all Vessels that varies depending on the ship. It works much as regular DR in NWN. A Ship will have an amount of damage it can absorb and a soak value, e.g 5/+3. This means any Projectiles under +3 will have at least 5 points of their damage reduced and in some cases of weaker projectiles and weapons completly absorb the damage entirely.
However, a projectile's bonus is increased by +1 if used in the same quadrant as the ship they are attacking. Making a +3 Projectile a +4 for the sake of penetrating a Ship's DR. So moving closer to another vessel with high DR will pay off.
This also means some weaker weapons with weaker projectiles will be useless at a larger distance while stronger weapons may be more useful, though moving closer in to a target ship it may be ideal to switch to another weapon loadout as the projectiles will be stronger and can breach the DR.
DR can be viewed under -ship stats. These value may be tweaked in the near future as we see how it pans out.
Ship Abilities
Some ships have unique abilities that can be triggered from the Navigator. If a Ship has multiple abilities the cooldown of all abilities will be the last ability activated. Only one ability can be activated at a time. (Ex.: a "Horn Blast" which provides minor buffs to the attacking crew and debuffs to the defending crew.)
Jump Overboard
This option allows for a Constitution save vs death to appear in a random location. This location can be anything from the standard islands to another player run ship if it is out.
The Jump Overboard option is an interactable square on the deck of the ship
Additional Features
Ship to Ship Communication
Ships on the same grid square, outside of the center grid square (Arelith) can use the Shout channel to communicate with each other.
Critical Ship Alerts
Critical Ship Alerts will now alert players below deck or in other areas linked to a ship.
Rigging
Ships now have 1 or 2 rigging objects, depending on ship size. These can be used to manipulate the sails to Lowered, Half-Mast or Full Sails. Changing the sails takes 1 Turn for each step, so moving from Lowered to Half-Mast takes 1 Turn, while moving from Lowered to Full Sails takes 2 Turns.
The time it takes is decreased by 6 seconds for every 5 ranks in Sail. The Sailing Skill used is the combined skill of the two PCs using the Rigging object, or the one PC for smaller vessels. For larger ships the skill is divided by two.
To start the process a PC has to interact with the place-able and choose which state to move the sails to. For larger ships the closest PC to the other rigging object (3 meters) will automatically help out. A Progress Bar and feedback will be presented to the player(s) using the rigging. Cancelling the progress bar in anyway will reset the process.
- Lowered Sails:
Ship's Speed is lowered to 5% of the Max Speed +10 on Artillery Checks when firing against another Vessel -20 on Evading / Dodging Artillery from an enemy Vessel +3 on Firing Grapple Hook -3 on Evading / Dodging Grapple Hooks from an enemy Vessel
- Medium Sails:
Ship's Speed is lowered to 50% of the Max Speed
- Full Sails:
Ship's Speed unaffected -20 on Artillery Checks when firing against another Vessel +10 on Evading / Dodging Artillery from an enemy Vessel -3 on Firing Grapple Hook +3 on Evading / Dodging Grapple Hooks from an enemy Vessel
Diving Bell
For now only the 4 Flag Ships will be equipped with a Diving Bell (Cordor Flagship, Dreadnought, Guldorand Galleon and Wailing Maiden). And this is subject to change / update as we go. This first release will be for testing and see how well it works and will be expanded upon in the future.
Ships with a Diving Bell can Ascend / Descend it with players inside. There's a limit to Oxygen and Hull integrity and at lower depths the oxygen and hull is depleted faster. More players inside the Diving Bell also affects Oxygen. Players on deck can pump Oxygen down into the active Diving Bell but will be reduced depending on the bell's current depth. On Lower depths the Hull integrity will be damaged as well.
A ship can't move while a Diving Bell is currently moving or Stationary at the bottom of the ocean floor. It has to be fully raised up for a ship to move again. Also a Diving Bell can only be lowered or raised if the ship is stationary (Staying in their current Quadrant). Diving Bells can only be used when out at sea outside of Arelith proper.
Each Quadrant has a unique depth and by lowering to the bottom of that quadrant players can harvest resources (Both existing and new) and encounter unique events. Again this is work in progress and will be fleshed out more as we go. Usually there are no hostile mobs but possible to encounter in some events.
Exiting the Diving Bell underwater you are subject to a few effects. If the character can't breathe underwater they will drown in X amount of rounsd based on their CON modifier. Some races can breathe underwater just fine and won't be subject to this.
Diving Bells can be upgraded at a Shipwright and if a Ship is destroyed you won't lose these upgrades, unlike Sails & Hull.
Ship Management
Weaponry
Some ships can now hold ship weapons. Smaller ships are unable to use weapons but larger ones can and this comes in 4 Tiers:
- Tier 0 - No Weapons
- Tier 1 - Light Ballista
- Tier 2 - Heavy Ballista
- Tier 3 - Mangonel
- Tier 4 - Bombard
Ships have a Weapons Tier (Maximum weapon capacity) which represents how many weapons can be deployed on them, Shipwrights will display the Weapon Tier of a ship. For instance a Ship with a Weapon Tier of 3 can hold a Mangonel but not a Bombard. Alternatively It could also hold 3 Light Ballistas (Tier 1) that together becomes a total of a Tier 3 or 1 Light Ballista and 1 Heavy Ballista. This offers different loadouts one can experiment with. The penalty of using weapons on a ship is losing speed. For each Weapon Tier(s) utilized by fitting a weapon, a ship will lose 7% speed, so a fully maxed weapon loadout at Tier 4 would give a 4 x 7 = 28% penalty to Ship's Speed.
See the Siege Weapons page for recipes for crafting the ship-based weaponry.
Upgrades
A ship can be upgraded by spending resources and gold at a Shipwright NPC. Higher Tiers require more rare and sometimes very unique resources or items. Each ship has different max tiers; for example, a ship might be able to be upgraded to Tier 1 Sails and Tier 4 Hull.
Currently there are two upgrades available:
- Hull - Increases a Ship's Hitpoints 30 for each tier
- Sails - Increases a Ship's Speed
Destruction
A ship can be destroyed and sink if its Health goes below 0. When this happens all players on board the ship will fall into the sea much like the "Jump Overboard" feature. A destroyed ship is useless until the next server reset where it will be brought back again. However, the penalty of losing a ship will destroy any deployed weapons on deck.
- Note: You can repair your ship's hull at a Shipwright NPC.
Persistent Location
Ships are now storing their location persistently by Landmark or Dock. Meaning each time a ship reach a new harbor (Not Random Event locations) it will spawn there next reset. Rentable ships are excluded from this.
Weather
The weather will change depending on region of the Trackless Sea a ship is currently located at: e.g colder in the North, warmer in the South. Weather has a large impact on many features of the Ship System. For instance a thick fog will make it more difficult to spot ships and target them and tailwind will increase the speed of a ship.
WIP: Storm
- WIP: Added a moveable storm across the Grid, it will spawn in certain conditions and move around the grid. One can use the -ship command to get more weather information. This will be fleshed out a bit more in the future, consider this one a test sort of.
- Sea Storms to last longer (6 IG hours when they spawn) and moves across a path on the grid, rather than randomly as previously. If a Ship is caught in a Storm quadrant lightning will spawn around the ship with a chance to strike the ship itself, causing damage to it and any nearby PCs.
Ship Tools/Items
Certain items/tools exist in the game which can be used, from a characters inventory, while sailing. These items must be obtained by the character in the module and brought on to the ship to be used.
Sextant
Use this tool (Requires INT mod of 3 or 15 Sail skill) on a ship to determine an approximate time left remaining to a destination (landmark, dock) or quadrant.
Spyglass
This item an be used on the deck of a Ship and allows the user to select a spotted vessel in the vicinity to assess. The user must make a Sail skill check to reveal further information about a Vessel.
- Failing the check reveals basic information.
- Failing to spot a vessel in the vicinity will not be revealed to prevent meta information about nearby ships
- Succeeding the check reveals:
- The Vessel's Speed (vs your own Ship)
- Hull Integrity
- Number of Players on Deck
- Which weapons are deployed on the Vessel
- Reveals a target ship's class
- May also be used to Assess Ports with the Spyglass item if a ship is docked to it (The option will only be available if docked). This allows players to scout (With a check) the port area for any activity such as other players and ships.
This item can be bought from the Trading Ship merchant.
The Spyglass Tool / Item has been updated to allow to search for the random event landmarks based on the Quadrant you are in, this is a Sails check.
- There is a cooldown on this and DC varies depending on weather (night, mist) the CR of the current sea tile etc.
- Making this roll will instantly have the Navigator find it as well and you can talk to them to activate the event as usual.
Sailing the Penny Rose
An example afternoon trip on the Penny Rose renting the ship, traveling to the Crow's Nest to check on the hull, a quick jaunt out East to a shipwreck, and then back to the Penny's home at the Brogendenstein docks.
Renting a Charter Ship
Visit the Brogendenstein docks. Down the cliffs and at the edge of the surf is the sign to rent the Penny Rose. Have 500 gold ready and, if the ship isn't already rented, it will be possible to rent the Penny Rose. Once rented, the Penny Rose marker will display a quarter management menu. Quarters powers have limited uses for rent-able ships, but for leased and state-owned ships that have true ownership leases these options are important for faction management.
The Captain function in faction management is still useful for rent-able ships. Setting this status allows characters with the faction Captain role to also speak to the navigator and pilot the ship. First, assign a faction from the quarter management menu for the Penny Rose. Next, in the -factions menu choose the faction assigned and choose view ranks > select a rank to have Captain powers > choose Set Powers > choose Shop and Quarter powers > and Captain will be at the bottom of that list. Click the Captain power once to toggle from red to green to turn the Captain ability on. Now, characters in the faction with the chosen rank will be able to Captain the ship as well.


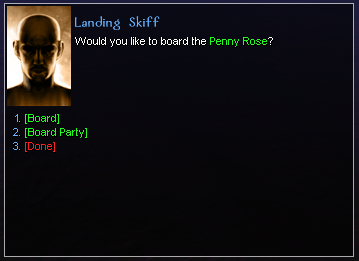
Boarding
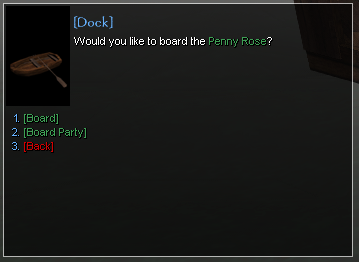
Head North from the Penny Rose's marker to find the Docks interact-able to board the ship. Other ships are visible, but it is not possible to board a ship from the docks if it is not rented or leased. Choose the Penny Rose and board as a single person or as the whole party. Characters in party are only able to board by standing next to the renter/owner while the renter/owner uses the party board option. Characters in the assigned faction (if one is assigned) are able to both board and party board.
-
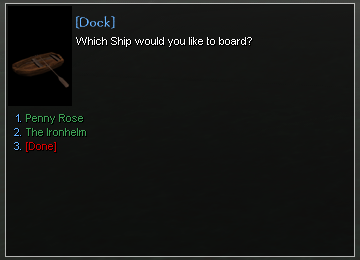
The Docks interact-able will show all the ships currently docked. -
Boarding the Penny Rose.


Getting Acquainted
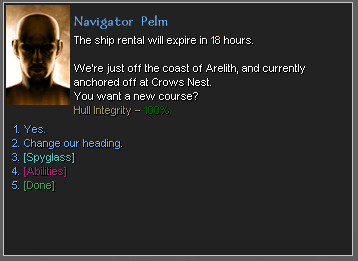
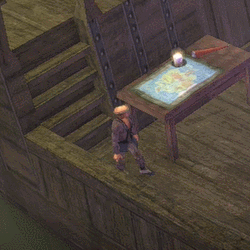
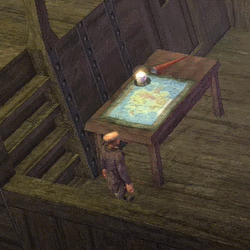
Meet the crew of the Penny Rose. Speak to Navigator Pelm to give sailing orders. The Boatswain will lower the skiff to allow departure from the ship at destinations. Crews on the other ships may be different, but all ships will have a navigator and a boatswain. Take a minute to explore the Penny Rose. It has a map, captain's room, below-decks, a place to jump overboard, and the fishing nets ability will deploy two interact-ables on the bow that allow fishing.
The ship is currently in the Local Waters naval grid. Take a moment to see the navigation and sailing options.
-
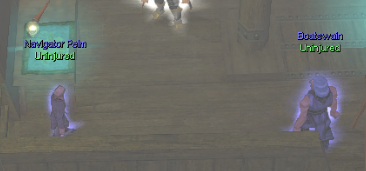
Navigator, Map, and Boatswain on the deck of the Penny Rose. -
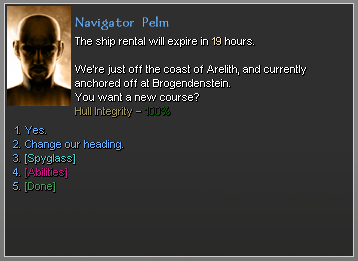
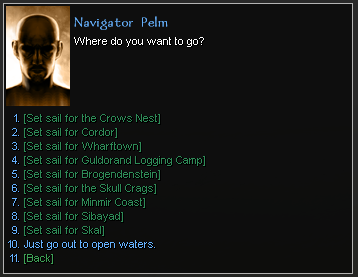
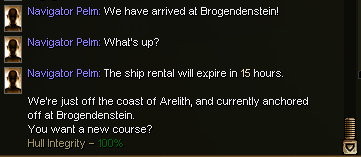
The navigator's menu when anchored at Brogendenstein. -

This menu is only available in the Local Waters naval grid. -
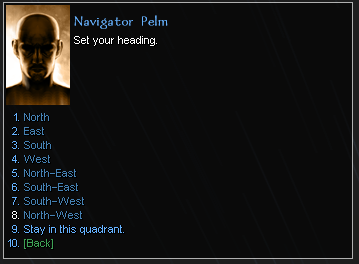
Choosing a heading rather than a destination. -
Checking the spyglass while anchored. -
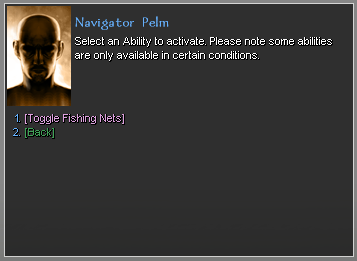
Checking the Abilities menu.


Getting Underway
Starting the journey. Choose Yes and then Set Sail for the Crows Nest. Note that this friendly destination menu is only available in the Local Waters naval grid. When sailing in open waters the option becomes to return to Arelith. The ship will animate with wake effects once it is underway.
Be ready for the possibility that enemies may board the ship. That could include others players if sailing outside the Local Waters naval grid. Only NPC enemies are possible in the first leg of the trip as only Local Waters are traveled.
The Navigator will announce any landmarks or other ships that pass by. Landmarks, naval grid changes, ships, and destinations also play a bell sound. On this first step of the trip the Penny Rose arrives at the Crow's Nest without spotting any land marks, but is boarded by enemies once.
-

Setting sail. -
Checking the map while underway to the Crow's Nest. -

NPC enemies boarding on the journey to the Crow's Nest. -

Checking in with the Navigator while en-route to the Crow's Nest. -

The Navigator announces arrival at the Crow's Nest. -
Checking in with the Navigator as the Penny Rose arrives at the Crow's Nest. -
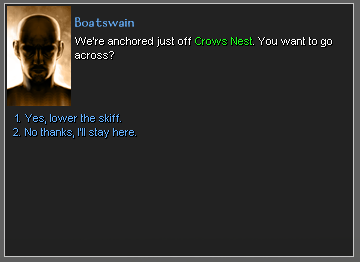
Leaving the Penny Rose for the Crow's Nest.


Speaking to the Shipwright
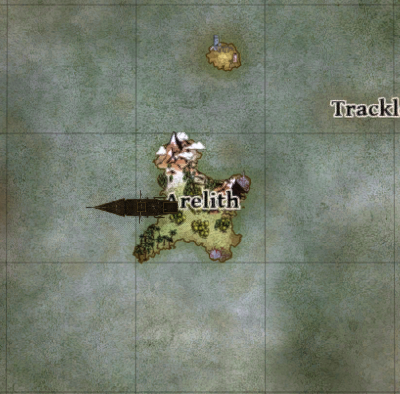
The Crow's Nest has a shipwright who can repair and upgrade ships that are docked there. The Shipwright will also display the current Hull, Sail, Weapon Tiers of the ship. Visit the Shipwright and see the upgrade options, including hull repair if damaged. Return to the Penny Rose by using the Docks at the Crow's Nest. Set off from the Crow's Nest and head back out to sea. This time choose East as the heading.
-
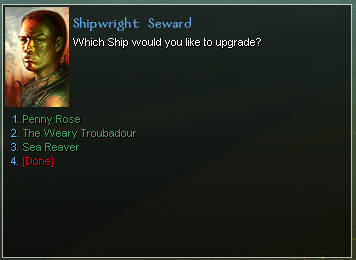
Speaking to the Shipwright. -
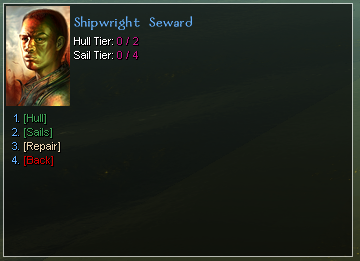
Checking on the Penny Rose's upgrades. -
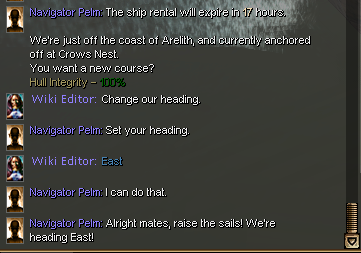
Leaving the Crow's Nest and heading East.


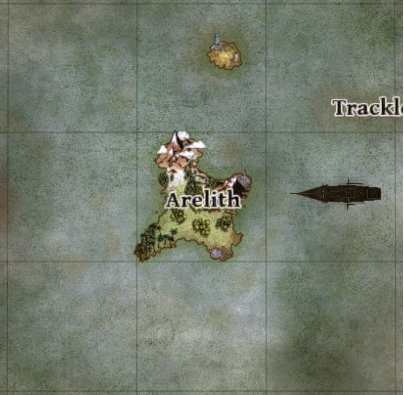
Encountering Landmarks
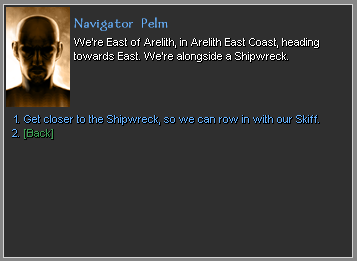
While heading East there is an alert that the Penny Rose has moved into the East Coast naval grid. It is now possible to encounter other player ships. As the journey East continues a shipwreck landmark is spotted. At this time it is possible to choose to visit the landmark by using the spyglass. Use the spyglass to interrupt the Eastward heading and sail towards the landmark. Once anchored at the landmark use the Boatswain to disembark and visit the shipwreck.
Eventually, if the spyglass hadn't been used, then the Penny Rose would have sailed past the landmark and continued Eastward. The ability to see the shipwreck landmark and use the spyglass to visit would be gone unless it was spotted passing by again later.
-
The Navigator announces moving into the East Coast naval grid. -
The Navigator announces that a shipwreck is spotted. -
Using the spyglass to sail to a landmark. -
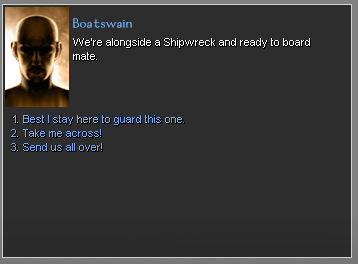
Talking to the Boatswain to disembark to the landmark.


Returning Home
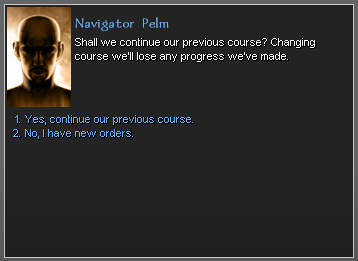
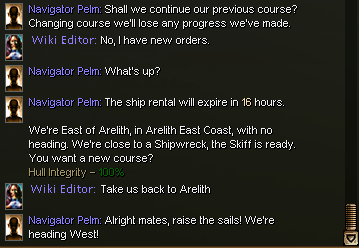
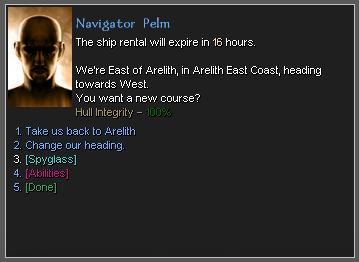
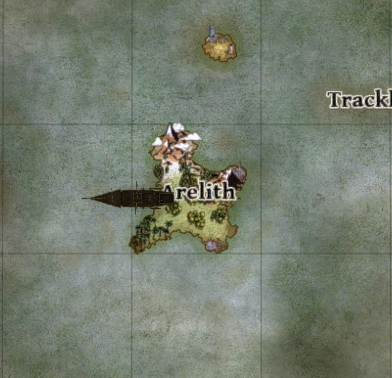
Return to the Penny Rose and head home after visiting the shipwreck. Landmarks will have docks or skiff landing sites to use to return to the ship. Return to the ship and speak to the navigator to continue the course or have a new direction. Continuing the course would mean continuing East. Choose new orders instead and choose to return to Arelith.
Note that the destination list is gone and is replaced with the option to "Take us back to Arelith". When the ship is out of the Local Waters naval grid there is no destination list. This does not mean it is not possible to sail to destinations. Sailing to a destination is also possible by knowing where the destination is on the map and using the map and heading direction orders to navigate to the destination.
-
Using the skiff at the landmark to return to the Penny Rose. -
Speaking with the Navigator while at a landmark. -
Directing the Navigator to return to Arelith. -
Checking in with the Navigator as the Penny Rose is heading home. -
Viewing the map as the Penny Rose is heading home.


Last Leg
Return to the Local Waters naval grid and choose the Brogendenstein destination. A sandbank landmark is spotted, but the Penny Rose heads home rather than investigating.
Note that 4 in-game hours have passed since the ship was rented, sailed, and returned. This is more than 24 minutes of real time spent on the short trip. This is for a Penny Rose ship without any upgrades.
-
Checking the map when arriving in the Local Waters naval grid. -
The destination list is back since the ship has returned to the Local Waters naval grid. -

Navigator conversation to return to Brogendenstein from the Local Waters naval grid. -
Navigator announces returned to Brogendenstein.


